The GrowerIQ Mobile Scanner can receive new inventory into your site right from the warehouse floor, no computer required. Unlike most scanner actions, you do not scan a barcode to start. You tap Receive Inventory on the home screen and fill out the form.
In this article:
- When you would use it
- Before you begin
- Receiving inventory step by step
- What happens next
- Good to know
📦 When you would use it
A delivery arrives and you want it logged in GrowerIQ on the spot, while you are still standing at the receiving dock. Instead of writing it down and entering it later at a desk, you receive it straight from the scanner.
This is the same receiving you already do on the web, brought to the scanner so the person handling the shipment can record it as it lands.
✅ Before you begin
- Your role needs the Receive Inventory scanner action. This is off by default, so an administrator has to grant it.
- The scanner must be online. Receiving is not available offline.
You need the Receive Inventory permission
The Receive Inventory button only appears for roles that have been granted the scanner receive action. If you do not see it on the home screen, ask an administrator to enable it. See Set Up Scanner Access for a Role.
Online only
The scanner sends the receipt to your site as you submit it, so you need a connection. There is no offline queue for receiving.
📝 Receiving inventory step by step
- On the scanner home screen, tap Receive Inventory (just below the scan button).
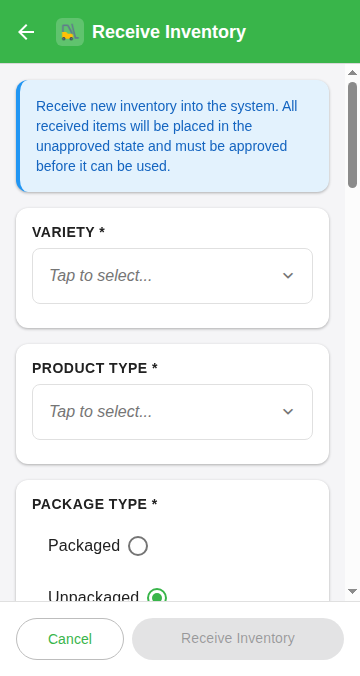
- Fill out the form:
| Field | What to enter |
|---|---|
| Variety | The product's variety and strain, from the varieties set up on your site. |
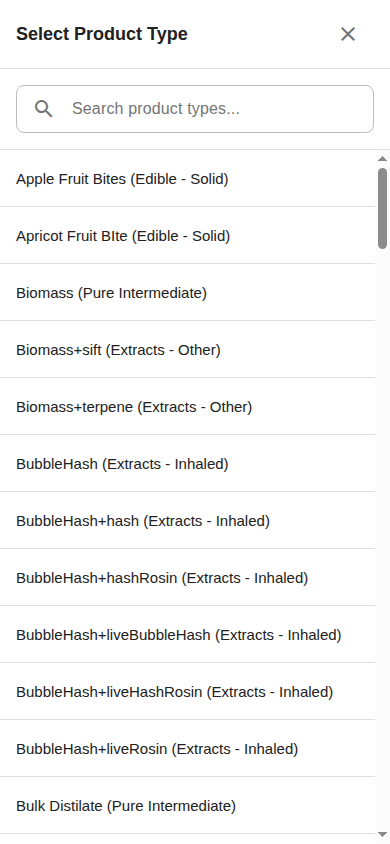
| Product Type | The product (end) type. Tap to open a searchable dropdown that lists every product type enabled on your site, then pick one. |
| Package Type | Packaged or Unpackaged. |
| Quantity / Weight | The amount received. When the product type is measured by weight, use Connect Scale to read from a networked scale, or Weigh Multiple to weigh several containers and add them up. Counts, such as plants or seeds, are typed in. For a packaged product, the amount comes from the SKU you pick. |
| Net Weight Received | Seeds only. The total weight of the seeds, in grams. Connect Scale and Weigh Multiple work here too. |
| Total Cost | The total cost of the inventory. |
| Timestamp | When the inventory was received (defaults to now). |
| Vendor | The supplier, from your CRM supplier accounts. |
| Source Lot Number | The supplier's lot number. Required, for your reference. |
| Purchase Order # | Your PO number. Required, for your reference. |
| Location | Where the inventory is being stored. |
| Delivery Matches PO? | Yes or No. |
| Damage to Shipment? | No or Yes. |
| Intended Use | A short description of what the inventory is for. |
| Cannabinoid Profile | Optional. THC % and CBD %. |
| Weighed By / Checked By | The people who weighed and checked the delivery. |
- Tap Receive Inventory at the bottom to submit.
Finding the right product type fast
The Product Type dropdown can be long. Start typing in its search box to filter the list down to what you are looking for.
Weighing across several containers
When one delivery is split across bags or totes, use Weigh Multiple to weigh each one and have the scanner add them into a single total. See Weighing in Batches.
🔄 What happens next
Inventory received from the scanner is added to your site in the unapproved state. A user with permission to approve received inventory then reviews and approves it, either on the scanner (scan the received item and tap Approve) or in the web app.
Approving the receipt
On the scanner, scan the received item and tap Approve. In the web app, go to Warehouse > Received Inventory to find the receipt and approve it. Most management actions only become available once it is approved. See Working With Received Inventory.
💡 Good to know
- No barcode needed. Receiving is the one scanner action you start from a button, not by scanning.
- Imperial or metric. The Quantity / Weight box follows your organization's unit setting, so imperial organizations weigh in ounces or pounds. Net Weight Received for seeds is always in grams.
- Networked scales work here. Connect a scale to capture weights without typing them.
- Cannabinoid profile is optional. Leave THC % and CBD % blank if you do not have them yet.