A networked weighing scale can feed weights straight into the GrowerIQ Mobile Scanner, so you never have to read a number off the display and type it in by hand. This live auto-fill is unique to the scanner: an administrator sets the scale up once in the GrowerIQ web app, and after that operators just pick it and weigh.
In this article:
- How it works
- Step 1: Add the scale (administrator, web app)
- Step 2: Connect the scale on the scanner
- Changing the scale or typing the weight
- Reading the connection status
- Filling the weight field: Manual, Auto, Confirm
- Weighing several bags at once
- If the scale won't connect
⚙️ How it works
The scale sits on the same local network as your device. The scanner talks to it over that network using the scale's address, reads the weight live, and drops it into the weight field for you. There's nothing to wire up on your end.
The scale buttons appear on every box that takes a weight: grams or kilograms, or ounces or pounds for imperial organizations. You'll find them on these screens:
- Record Harvest Weight, Record Dry Weight, Record Cured Weight, Record Crude Oil Weight, Record Distilled Oil Weight and Record Processed Weight
- Split Batch, Start Processing, Create Lot, Adjust Weight and Create Sample
- Defoliate and Prune, when Collect Material for Destruction is on
- Queue For Destruction, Receive Inventory and Receive From Processor
- Add Pesticide and Log Fertigation, for supplies measured in grams or kilograms
Counts, liquids and other units get a plain box with no scale buttons, so if a screen asks for a number of items or a volume, that's expected. You type those in.
Each box shows its unit beside it. If your organization uses imperial units, the boxes that show ounces or pounds on the desktop app show them on the scanner too. Whatever unit the scale reports in, the scanner converts the reading to the box's unit when it fills the box.
Two parts, two people
A GrowerIQ administrator adds the scale once in the web app (Administration > Equipment) with its network address. After that, operators only ever pick the scale on the scanner. See Adding Hardware Equipment for the admin steps and the list of supported scale types.
🛠️ Step 1: Add the scale (administrator, web app)
Before anyone can weigh, a GrowerIQ administrator adds the scale in the GrowerIQ web app under Administration > Equipment. They choose the Scale equipment type and enter the scale's IP address.
The IP address is what lets the scanner find the scale on the network. The scanner uses the IP Address first, and the Internal IP Address when IP Address is blank. If no port number is entered, the scanner uses port 9761. There's nothing else to fill in for the scanner.
This article covers the scanner side. For the full setup steps and the list of supported scale types, see Adding Hardware Equipment.
📲 Step 2: Connect the scale on the scanner
On a weight field, here's how an operator connects:
- Tap Connect Scale.
- Pick your scale from the list. Each scale shows its name and network address.
- The scanner connects to it over the network.
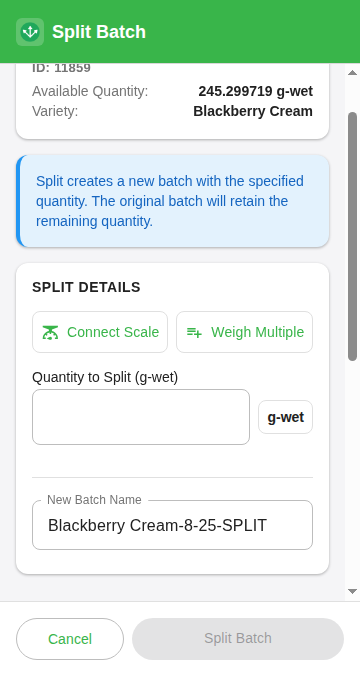
You only ever pick the scale from the list. You never type the address yourself, and you can ignore the number that shows after it; it's just part of the network address and the scanner handles it for you.
While the list loads you'll see Loading scales.... If it can't load, it says Failed to load scales. Please try again. with a Retry button. If no scales are set up, you'll see No scales configured. Add a scale in equipment settings. That means Step 1 hasn't been done yet, so ask your administrator to add the scale (see Adding Hardware Equipment).
Your scale is remembered for each organization
The scanner saves the scale you picked for the organization you're working in, and reconnects to it automatically the next time you open the scanner. Switching organization disconnects the scale, and switching back reconnects the scale you picked there. Logging out, including the automatic sign-out after a few minutes without activity, forgets the scale for the organization you were in, so you'll pick it again after your next sign-in.
🔁 Changing the scale or typing the weight
Once a scale is picked, the button reads Change Scale. It's there whether the scale is connected or not. Tap it at any time to open the scale list again. The scale you're using is outlined and ticked.
- Tap another scale to switch to it.
- Tap No scale (Enter the weight by hand) to stop using a scale. The scanner disconnects and forgets the scale, and you type the weight into the box. A weight already in the box stays.
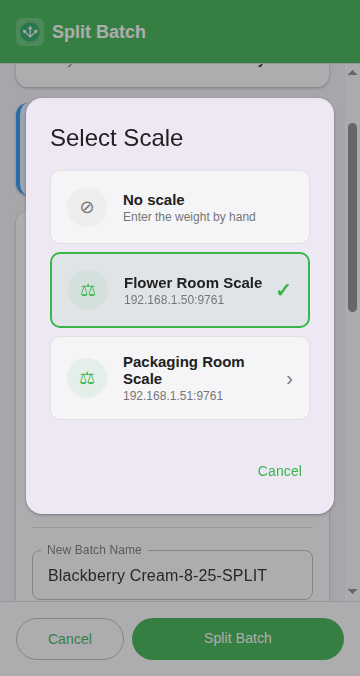
You never need a scale to fill a weight box. With no scale picked, or in Manual mode, type the weight. A weight typed with a decimal comma, for example 12,5, is saved as 12.5.
Switching scales clears a weight from the old scale
If a box holds a weight that came from the previous scale, switching to a different scale clears it, so the weight is never saved under the new scale's name. Weigh again on the new scale. A weight you typed yourself is kept.
🟢 Reading the connection status
Once a scale is picked, a status bar above the buttons shows its name and a small connection indicator. It tells you at a glance whether you're good to weigh.
| Indicator | Meaning |
|---|---|
| Green dot | Connected and ready to weigh |
| Small spinner | Connecting |
| Red dot | Not connected, or a connection error |
When the dot is red, a message under the scale name can tell you why. See If the scale won't connect.
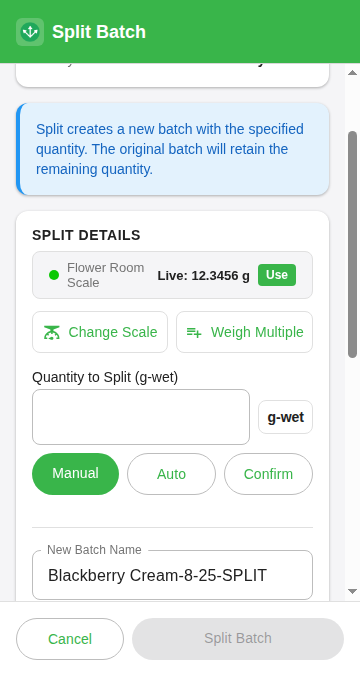
When you're connected, the status bar also shows a live reading, labelled Live: with the current weight and the unit the scale reports in. It refreshes on its own every few seconds, so the number stays current as you add or remove product on the scale.
✍️ Filling the weight field: Manual, Auto, Confirm
Once connected, you choose how the live reading goes into the weight field. There are three modes, and their buttons show under the box while the scale is connected.
| Mode | What it does |
|---|---|
| Manual | The live reading shows on screen. Tap Use to drop the current weight into the field. You can still type in the field yourself. |
| Auto | The field fills with the current reading straight away and keeps tracking the scale. You can't type in the field while Auto is on. If the scale disconnects, the box goes back to Manual so you can type. |
| Confirm | Locks the value you have now and stops the live updates for this box. Tap Edit to go back to live readings. |
For the most accurate number, let the scale settle before you read it. The weight has settled when the live reading stops changing.
On screens with several weight boxes, such as Split Batch with more than one split, each box has its own mode. Confirming one box doesn't stop the live readings in the others.
Some boxes are filled in for you and locked, for example a destruction weight that's calculated for you, or a packaged product's weight that comes from its SKU on Receive Inventory. On those boxes Use, the mode buttons and Weigh Multiple are hidden, so the scale can't change the weight. The Change Scale button and the status bar stay.
Use Auto for hands-free weighing
Switch to Auto and the weight field fills itself and keeps tracking the scale, so you never type a number. Tap Confirm to lock the reading once it settles, then Edit if you need to weigh again.
🧺 Weighing several bags at once
When you have several bags or containers to weigh into one entry, tap Weigh Multiple. This opens a screen where you weigh each one in turn, and the scanner adds them into a single total. That total goes back into the box you opened it from. Other boxes on the screen are not changed.
This multi-bag batch weighing is unique to the scanner. For the full walkthrough, see Weighing in Batches.
🔌 If the scale won't connect
If the scale won't connect, or the reading looks wrong, work through these checks:
- Make sure the scale is powered on and on the same network or Wi-Fi as your device.
- Ask your administrator to confirm the IP address entered in Equipment is correct. The scanner uses the IP Address first, and the Internal IP Address only when IP Address is blank.
- If the weight reads negative, you'll see Negative weight detected (tare offset?). Zero or tare the scale on the scale itself (using its own controls), then read again.
- Tap Change Scale and pick the scale again to retry, or pick a different scale.
When a scale can't connect, the box shows one of these messages under the scale name:
| Message | What to do |
|---|---|
| This scale has no IP address. Add one in equipment settings. | Ask your administrator to add the scale's IP address in Equipment. |
| Could not reach the scale. Check its IP address and the network. | The scanner tried several times and could not reach the scale, either when you picked it or when the scanner started. Run through the checks above. |
| The scale connection failed. Check the scale and try again. | The connection dropped, or the scale sent nothing the scanner could read as a weight. Check the scale, then pick it again. If it keeps happening, ask your administrator to check the scale's address and port in Equipment. |
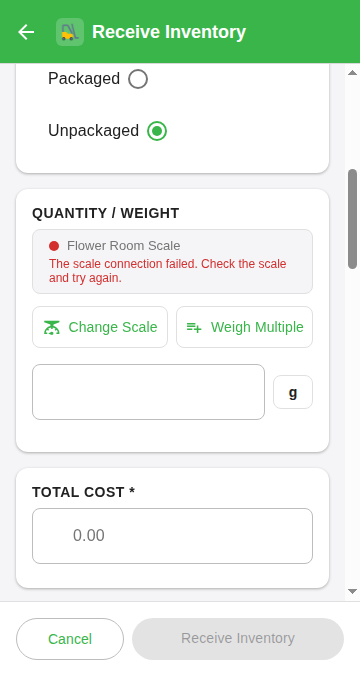
Same network, correct IP
The scanner finds the scale by its address over your local network. If the scale won't connect, check that it is powered on, on the same network as the device, and that the address entered in Equipment is correct.