The GrowerIQ Mobile Scanner can print a label for any item you scan, sending it straight to a connected Zebra printer. You never design a label on the device. The label templates themselves are built in the web app using the AI Label Builder, and they show up here ready to pick.
In this article:
- 🚀 Two ways to start a print
- 🏷️ Choose a label template
- 🖨️ Choose a printer
- 🔢 Set copies and numbering
- ✅ Confirm and print
- 🛠️ If something goes wrong
🚀 Two ways to start a print
There are two easy ways to reach the Print Label screen.
1. From a scanned item. Scan an item, open its list of actions, and choose Print Label. This action is available on scanned items across the board: batches, lots, mothers, vessels, package runs, received inventory, samples, and even locations and user badges.
2. Right after another action. When you finish certain actions (such as splitting a batch, taking a sample, starting processing, creating mothers, or queuing for destruction), a success dialog pops up and asks "Would you like to print a label?" with two buttons: Skip and Print Label. Tap Print Label to jump straight into printing for the item you just created.
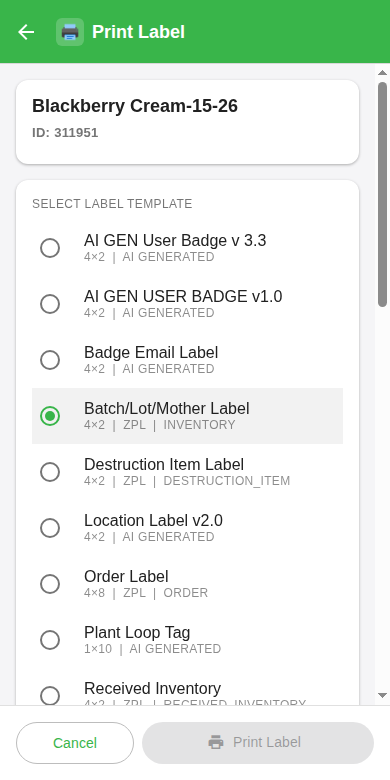
Both routes open the same Print Label screen, which shows the item's name and ID in a card at the top so you always know what you are labelling.
Print right after an action
When you split a batch, take a sample, or create mothers, the success dialog offers a Print Label button. Tap it to print the new item's label immediately instead of scanning the item again.
If the Print Label action on a scanned item looks greyed out, your role does not have permission to print labels. A GrowerIQ administrator can grant that access to your role.
🏷️ Choose a label template
The first card on the screen is Select Label Template. It lists the templates available to your organization. Tap one to select it.
Each row shows the template name, with its size, format, and type in small uppercase text underneath. Templates marked AI Generated come from the AI Label Builder in the web app.
| In the list you'll see | What it means |
|---|---|
| Template name | The label's name, used as the row title |
| Size, format, type | A quick summary line under the name (small uppercase text) |
| AI Generated tag | This template was designed in the AI Label Builder |
If the card reads No label templates available, no templates have been built yet. Build them in the web app under Administration > AI Label Builder, and they will appear here.
🖨️ Choose a printer
The next card is Select Printer. This list is your organization's configured printers, set up by an administrator under Administration > Equipment. Tap a printer to select it.
Each printer row shows its name, along with its IP address and location.
| What you might see | What it means |
|---|---|
| Printer name + IP + location | Ready to use, tap to select |
| NO IP CONFIGURED | Missing its network address, cannot print yet |
| No printers configured | No printers have been added yet |
A printer showing NO IP CONFIGURED is missing the network address it needs to receive labels. It cannot print until an administrator adds the IP.
'NO IP CONFIGURED' printers cannot print
A printer showing NO IP CONFIGURED has no network address. A GrowerIQ administrator needs to add the printer's IP under Administration > Equipment before you can use it.
🔢 Set copies and numbering
The last card is Print Options. This is where you choose how many labels to print and whether to number them.
Use the Number of Labels stepper to set how many copies you want. Turn on Number labels (1 of X) if you want each label numbered in sequence. When you switch it on, two more fields appear, plus a live preview that shows exactly how the labels will be numbered before you print.
| Option | What it does |
|---|---|
| Number of Labels | How many copies to print (default is 1) |
| Starting # | The first number in the sequence (when numbering is on) |
| Out of | The total the labels count toward, shown with a slash in the preview, e.g. "1/10" |
Keep an eye on the "Labels will print as:" preview to confirm the numbering looks right before you send.
✅ Confirm and print
The Print Label button at the bottom stays greyed out until you have selected both a label template and a printer. Once both are chosen, the button turns on.
The button stays grey until you pick both
The Print Label button only activates once you have selected a label template AND a printer. If it looks disabled, check that both cards have a selection.
Tap Print Label to send. The app checks the printer first, then prepares your chosen template and sends the finished label over your network to the Zebra printer. While it works, the button shows a loading state.
- Print Sent. You see a confirmation reading "Label sent to [your printer name]" and the app returns to the previous screen when you tap OK.
- Print Job Sent / Unable to confirm delivery. The label was sent, but the printer did not send a confirmation back. This is normal on some networks. The app still returns to the previous screen. Just glance at the printer to confirm it printed.
'Unable to confirm delivery' is usually fine
On some networks the printer accepts the label but does not send a confirmation back. The label was still sent. Just check the printer to confirm it printed.
🛠️ If something goes wrong
A few quick fixes for the most common hiccups:
| What you see | What to do |
|---|---|
| Print Label action greyed out on a scanned item | Your role lacks permission to print labels. A GrowerIQ administrator can grant it. |
| Printer Error when you try to print | The selected printer has no IP or an invalid one. An administrator fixes this under Administration > Equipment. |
| No label templates available | None are built yet. Create them in the AI Label Builder (web app, under Administration). |
| No printers configured | None have been added yet. An administrator adds them under Equipment. |
| An inline error card with a Dismiss button | Something else went wrong while sending. Re-check the printer's network and power, then try again. |
For app basics like installing, logging in, and scanning, see Getting Started with the Mobile Scanner.
➡️ Related articles
- AI Label Builder: Overview & Getting Started
- Print a Label from the Web App
- Print Plant Tags (Loop Labels)
- Set Up a Printer & Fix Printing Problems
- Getting Started with the Mobile Scanner
- Logging In and Choosing Your Organization
- Switching Languages on the Mobile Scanner
- Troubleshooting the Mobile Scanner
- Weighing in Batches
- Connecting a Scale for Live Weights