Loop labels are plant tags. Instead of printing one tag at a time, you design a single tag and the system tiles several onto each sheet, so you can tag a whole batch in one print job. Here is how they work.
In this article:
🎯 Why this matters
Tagging plants one label at a time is slow and wastes stock. Loop labels let you print many plant tags from one design, each with its own plant ID, in a single run.
🌱 What a loop label is
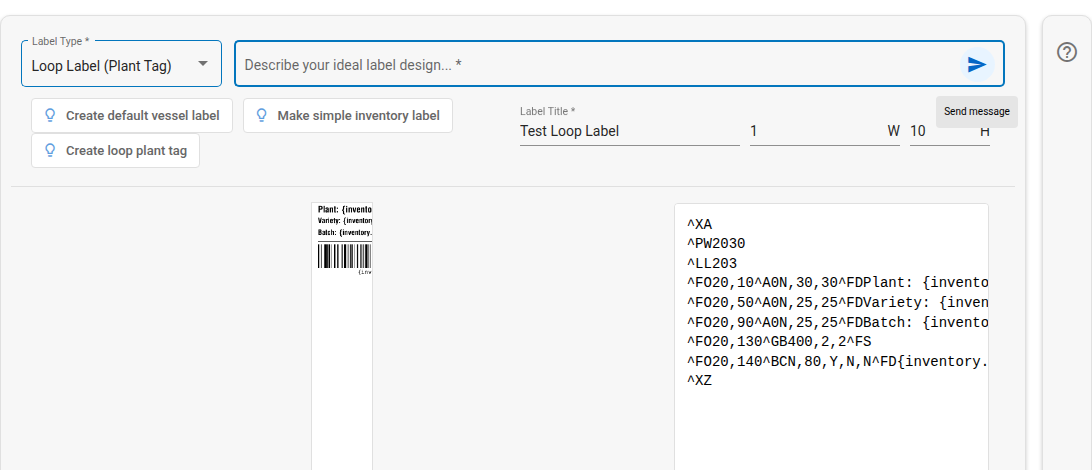
A loop label is a tall, narrow plant tag. You design one tag (typically 1" wide × 10" high) and the system automatically tiles 4 tags per 4" × 10" sheet at print time.
🏷️ Create a loop label
- In the AI Label Builder, choose the Loop Label (Plant Tag) type, or use the Create loop plant tag starter. The size sets to 1" × 10" automatically.
- Design the tag (see Design your label and Add data to your label).
- Add the
{inventory.plant_id}field so each tag carries its own plant ID. - Save it.
Give each tag a plant ID
Without a {inventory.plant_id} field, every tag prints the same. Add it so each plant gets a unique tag.
🖨️ Print plant tags
When you print a loop label from an item with plants, the Print Label dialog lets you choose which plant IDs to print:
- Select all Plant IDs
- Select a range of Plant IDs (a start and an end)
- Select Each Plant ID (choose them one by one)
A banner shows how many sheets will print (for example, "4 tags per sheet, 5 sheets will be printed").
Design one, print many
You only ever design a single tag. The system handles tiling 4 per sheet, so you do not need to lay out a grid yourself.
🔧 Troubleshooting
Every tag looks identical?
Add the {inventory.plant_id} field to your design so each tag shows its own plant ID.
Wrong number of sheets?
The count comes from how many plant IDs you selected. Check your plant ID selection (all, range, or each).